WEAPON EFFECT UI FOR MAYA was a project undertaken during the Scripting and Dynamics module at University, where we were given the freedom of choice concerning what to produce.
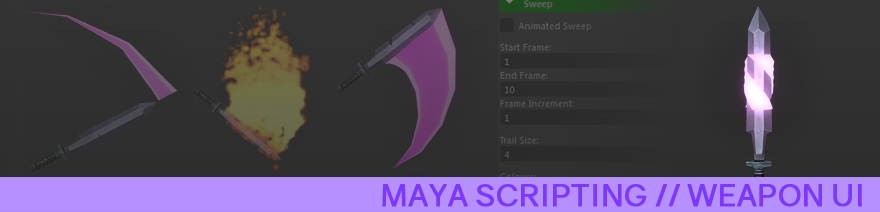
As the module dealt with tools and simulations in Maya, I decided to develop a tool that would allow an animator to add loft surface sweeps and particle emitters to weapons and props for quick pre-visualisation of effects, with the intention of the tool being used for video games where weapons normally have effect trails.
During creation I used a sword model licensed for Non-Commerical Use that can be found here. The focus of the project was on the tool and the scripting and as such no custom models were created during development.
For the tool to work, a CV curve must be parented to the weapon or prop, which is subsequently animated. The tool uses the CV curve to place the effects properly.
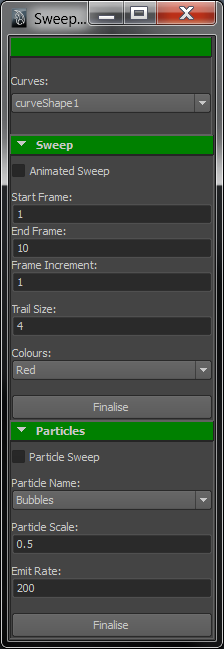
The script creates a list of all the CV curves visible in the scene and places them in a drop down list (at the top of the tool) so that artists can quickly select the curve being worked on.
Additionally this tool requires the use of Expressions to work. Only one line of code is needed to run the script, which is included in the .py file, and when the tool is no longer needed the expression can be deleted.
The Animated Sweep
The first component of the tool is the Animated Sweep tool. This allows an artist to apply an animated loft surface to the selected CV curve.
Firstly a snapshot of the CV curve’s frames is created using the animation start and end times, then the transforms created through this are used to generate a loft surface, which is then animated.
For this I referenced a script created by liubo on Vimeo [LINK] which detailed creating the animated sweep by taking the keyframes and setting the Node Status of the sections of the loft surface to be Normal or Blocking consecutively as the animation progresses.
Additions were made to allow the loft surface to disappear after a set amount of time and to ensure the loft surface is not visible at the start of the animation.
The options for the Animated Sweep are as follows:
Start Frame and End Frame – Set the frames the effect will run for.
Frame Increment – This is the increment the snapshot uses that dictates how many frames will be in between each transform. Different settings can cause faster or slower effects.
Trail Size – Changing this will change the length of the animated sweep.
Colours – Applies a variety of basic lambert colours to the loft surface.
The Particle Sweep
The particle sweep uses the Emit from Object tool in Maya to apply particle emitters to the CV curve. The script basically creates a particle system and applies it as you would expect, but it also contains a range of cleanup tools to prevent a buildup of unused material, particle and shader nodes, and removes leftover nuclei and emitters.
This is due to how the script handles the sweeps. The particles are re-created each time the animation restarts so that it can apply any changes the user made in the tool settings. Because of this, leftover, unused nodes can clog up the hypershade and outliner, so the script requires the cleanup.
Particles presets can be loaded into the script using the nodePreset function but Maya requires them to be in a different place to where particle presets are usually saved to. Despite this, once in the right place the script can easily access particle presets and apply them successfully.
(To elaborate for anyone else having issues here: To load nParticle presets using nodePreset, presets must have the prefix “transformPreset_” and must be placed within the Documents/maya/[maya version]/presets folder).
The options for the Particle Sweep are as follows:
Particle Name – Selects the particle preset to be used.
Particle Size – Changes the radius of the particles to allow for scaling systems.
Emit Rate – Changes the emit rate to allow for scaling systems.
The Finalise Buttons
Until you press the respective Finalise button, each effect will only exist as long as the corresponding checkbox is ticked. The tool will automatically clean up any unused nodes and objects so to keep any effect you have created, the Finalise button needed to be added.
The script works by using names to locate the objects and nodes it created. This allows it to manipulate, delete and recreate each object that is under its influence. To Finalise a sweep, the tool simply renames the sweeps so that it can no longer affect them.
For the Animated Sweep, this is a simple matter of renaming the snapshot and loft surface.
For the Particle Sweep this is a little more complicated, but boils down to renaming the particles and then copying over the input and shader nodes and applying them to the renamed particles.
The Script file is available over on github
Disclaimer: The script was originally built and tested in Maya 2011/2013. At present I am unable to provide any further support/bugfixing/tutorials.